What is Hippo CMS?
Hippo CMS is again the open-source content management system based on Java language, easy to integrate, testable and compatible with Java standards. Using Hippo is easy way to also serve your content from CMS where non technical firstuser could easily create and of course edit it.
Read more about Hippo CMS and its architecture at official website.
Hippo CMS Content REST API
Initially Hippo was designed and created for using classic hierarchical Model-View-Controller pattern to render web pages where every page is a hierarchy of MVC components. JavaServer Pages and FreeMarker template engine were and still are technologies strongly supported by Hippo for generating views.
Nowadays, when everything is heading towards REST communication architecture, also Hippo CMS is moving with the times. Its developers team met the challenge and exposed Hippo CMS’s content and content management capabilities over RESTful web services.
Contest REST API is one of several available mechanisms to expose RESTful services. This is a generic REST API running on top of the delivery tier, automatically exposing all published content in Hippo’s content repository based on the document types. If the Content REST API is insufficient, there is a possibility to create your own custom services using the delivery tier’s moreover support for JAX-RS.
Hippo CMS and Angular
Surely using Angular applications is a common way to consuming RESTful Web Services. Hippo team also indicates Angular app as great approach for retrieving and displaying documents stored in Hippo CMS’s content repository. Tutorial on official page contains ‘Feed an AngularJS App’ section which also describes how to run the Hippo project with this first, slowly getting old, version of Angular. Let’s go one step further and try to build new even so, being on top Angular 6 application, presenting our previously mentioned, documents from content repository.
Basing on Hippo CMS 12 and Angular 6 documentation and resources, we’re showing below simple example.
Example
This example concerns running whole project on your local development machine. It shows indeed how to get a document’s full content including texts, images and rich text content.
Prerequisites:
- Java 8 installed
- Maven 3 (3.2.1+) installed
- basic understanding of HTML, JSON, and Angular (2+)
- Node.js and npm installed
1. Creating the Hippo CMS Server
To simplify, let’s follow official Hippo page and create the project using the Hippo CMS Maven archetype:
mvn org.apache.maven.plugins:maven-archetype-plugin:2.4:generate \ -DarchetypeRepository=https://maven.onehippo.com/maven2 \ -DarchetypeGroupId=org.onehippo.cms7 \ -DarchetypeArtifactId=hippo-project-archetype \ -DarchetypeVersion=12.3.0
Building the project:
cd myhippoproject mvn clean verify
Running the project:
mvn -Pcargo.run -Drepo.path=storage
Above steps allows us to go to: http://localhost:8080/cms/, log in with: “admin” while as username and password, and then manage and look over our CMS content.
2. Enabling REST resources
Go to in case of : http://localhost:8080/essentials where you can find a Feature Library and add features that will be available in your project.
Select Tools:
→ find and click “Use Rest Services setup”
→ indeed make sure the option “Enable generic REST resources” is checked
→ click on the “Run setup” button.
After adding or modifying features in your project, as in this case, you always have to rebuild and restart the project with Maven.
3. Creating Hippo Document Type
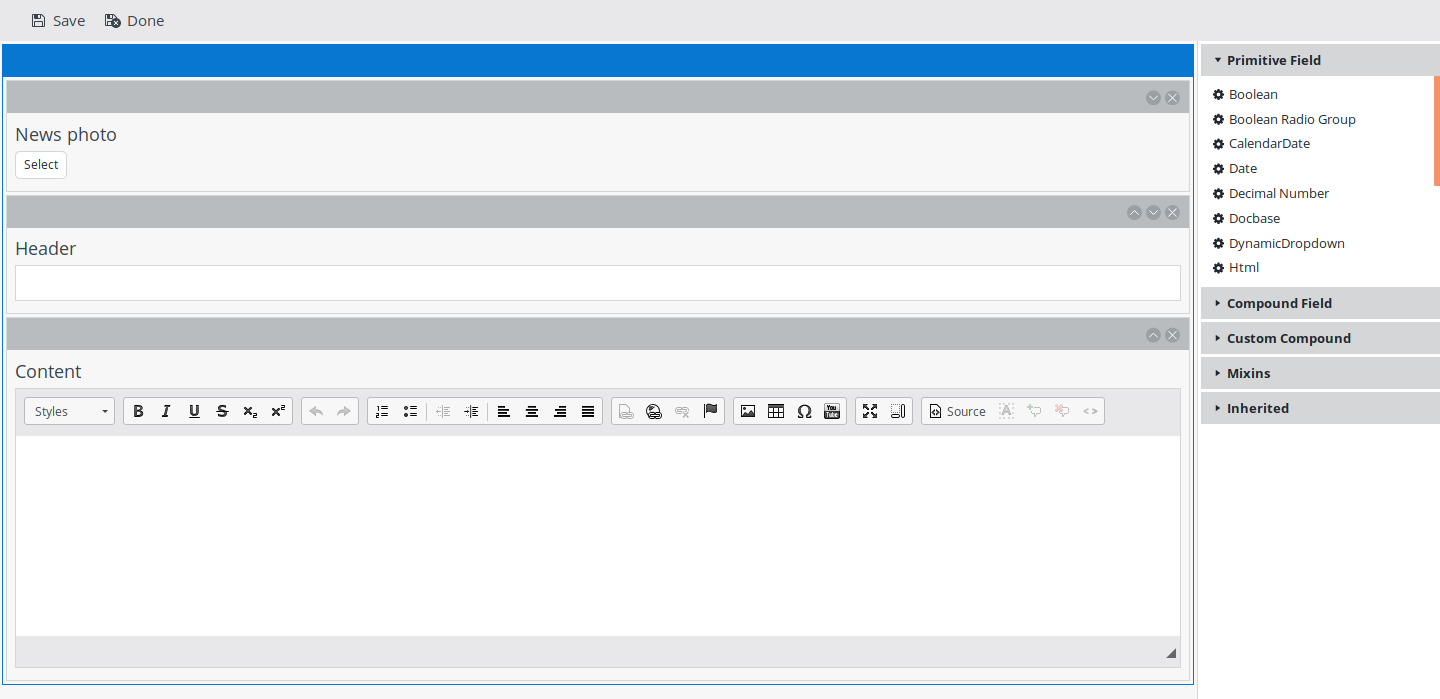
Let’s assume that we want to create “news” section. Every news contains: photo, header and content.
Log in to: http://localhost:8080/cms/, move to “Content” tab. Select” Document Types” option from select menu. Click “New document type” on your project name, name it and now you can arrange it. Using field types on the right side menu, try to make a document while to look like this one:

Fields: News photo → image link also, Header → string, Content → Rich Text Editor
By clicking on each element you can set moreover its Path option. Path will be used to invoke to these elements in Angular application.
Save and commit Document Type. Now decidedly it’s ready to use in our documents.
4. Creating documents
Select Document option from select menu and click “Add new document” on your for project name. Name it and choose created earlier Document Type.
Fill all fields with your custom texts. If you want add a photo you must add it in your “Images” section before (select “Images” option from select top menu. Click “Add image” on your project name while select photos from your local hard drive and upload them).
After saving, closing and publishing document that you have already created, your Hippo CMS service is now exposing it as REST API Conent. You can check it at: http://localhost:8080/site/api/documents.
Conclusion
Certainly in case of integrating Hippo CMS with latest so version of Angular seems not complicated. You shouldn’t worry also about the little documentation on this subject.
In example apart of above very simple and fast integration was presented. Complicity will increase with the increase of project size and client’s expectations.
Our mission is to support startups in achieving success. Feel free to reach out with any inquiries, and visit our blog for additional tips. Tune in to our podcast to glean insights from successful startup CEOs navigating their also ventures.
